
Understanding the Complete Process Behind Custom Patches Printing
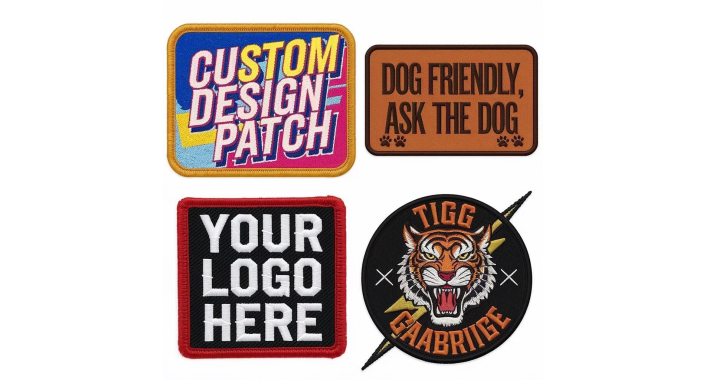
Modern emblem production combines digital printing technology, material science, and automated finishing. Unlike traditional embroidered patches that use heavy thread patterns, printed emblems allow full-color artwork, fine gradients, small text, and detailed graphics to print smoothly on fabric.
Understanding the step-by-step manufacturing process of Custom Patches Printing helps brand managers, product designers, and buyers prepare accurate artwork files, select durable materials, and achieve consistent results for apparel, corporate uniforms, and packaging.
Stage 1: Prepress Artwork Preparation and Vectorization
The manufacturing process begins long before fabric reaches the press floor. The prepress stage transforms visual artwork into production-ready digital files.
Converting Artwork to Clean Vector Graphics
Vector graphics serve as the foundation for commercial emblem manufacturing. Vector paths use mathematical formulas to define lines, shapes, and curves. This structure allows graphic designers to resize artwork without losing clarity or creating pixelated edges.
If designers must use raster images like photos, the files must maintain a minimum resolution of 300 DPI at full print dimensions. Low-resolution images downloaded from websites result in blurry lines when transferred onto fabric.
Managing CMYK Color Profiles and Pantone Spot Colors
Computer monitors display graphics using RGB (Red, Green, Blue) light, while commercial printing presses output physical colors using CMYK (Cyan, Magenta, Yellow, Black) inks.
During pre press setup, technicians convert graphic files from RGB to CMYK mode. When exact color matching is required for corporate logos, designers assign Pantone Matching System (PMS) spot colors to vector paths. This allows press operators to match physical dye output against standardized color references.
Setting Bleeds, Safe Zones, and Cut Lines
Physical printing and post-press trimming require exact artwork boundaries:
- Bleed Margin: Background colors and graphics must extend at least 0.125 inches beyond the final trim line to ensure complete color coverage if minor paper or fabric shifts occur.
- Inner Safe Boundary: Essential text, logos, and fine design details must sit at least 0.125 inches inside the trim line to prevent edge clipping during cutting.
- Vector CutContour Stroke: A dedicated 0.25pt vector stroke on its own layer defines the trim path. Named "CutContour" as a spot color set to overprint, this line guides automated laser optics or die blades without printing on the final fabric.
Stage 2: Substrate and Ink Selection
Selecting compatible base fabrics and ink systems ensures vivid colors and long-term durability.
Fabric Base Options for Sublimation Printing
The chosen base material must remain stable under high heat during transfer printing while providing a smooth surface for sharp graphics:
- Smooth Polyester Satin: Provides a flat, tightly woven surface that captures micro-text, fine details, and smooth gradients with high clarity.
- Polyester Twill Base: Features a subtle diagonal weave pattern that adds classic fabric texture while offering a flat surface for crisp ink transfer.
- Faux Leather and Polyurethane (PU): Used for modern corporate apparel and premium retail packaging displays, keeping ink on the non-porous surface for sharp contrast.
Dye-Sublimation Ink Chemistry
Dye-sublimation uses specialized disperse dyes suspended in liquid carriers. When exposed to high heat and pressure, these liquid dyes turn into gas without passing through a liquid state. The gas penetrates deep into synthetic polyester fibers and solidifies, making the graphic an integral part of the fabric that will not crack, peel, or fade over time.
Stage 3: The Sublimation Heat Transfer Process
Once digital artwork files and printing media are prepared, physical production begins.
High-Resolution Paper Printing
Industrial inkjet presses print digital artwork onto specialized heat-resistant transfer paper in reverse (mirror image) format using dye-sublimation inks. This step ensures that graphics transfer right-side up onto the final fabric base.
Rotary Heat Press Transfer Operations
The printed transfer paper and smooth polyester fabric feed together into a rotary heat press machine:
- Heat Application: The press heats the materials to temperatures between 375°F and 400°F (190°C to 205°C).
- Pressure Roller System: Heavy mechanical rollers press the paper firmly against the fabric.
- Dye Bonding: High heat turns the solid dye on the paper into gas, opening the polyester fibers so the dye gas settles deep inside them.
- Cooling and Solidification: As the fabric exits the heating zone, the fibers close and lock the dye permanently inside the material.
Stage 4: Backing Layer Lamination
After heat transfer printing, backing layers are applied to the rear fabric layer to make emblem attachment easy and secure.
Heat Seal (Iron-On) Backings
Heat seal backings feature a dry polymer film laminated to the rear fabric under controlled heat rollers. When reactivated with a commercial heat press machine, the adhesive melts and forms a permanent bond with cotton or polyester garment fibers.
Hook-and-Loop (Velcro) Fastening Systems
Hook-and-loop systems use a rigid hook backing laminated or stitched directly onto the rear fabric layer. This setup allows users to attach and swap out emblems on uniforms, caps, and tactical bags effortlessly.
Pressure-Sensitive Peel-and-Stick Backings
Peel-and-stick backings use a sticky acrylic adhesive protected by a silicone release liner paper. Users simply peel away the liner paper and stick the emblem directly onto smooth surfaces, making it ideal for temporary events, trade shows, or product packaging displays.
Plain Sew-On Backings
Plain backings use a lightweight mesh or protective paper layer. Professional tailors sew plain emblems directly onto heavy garments or jackets for maximum permanent hold.
Stage 5: Edge Border Finishing and Converting
The final manufacturing stage shapes individual emblems and seals the outer edges to prevent fraying.
Merrowed Overlock Stitch Borders
A merrowed border wraps a heavy overlock stitch around the outer edge using durable polyester thread. This traditional border finishing method works best on simple geometric shapes like circles, ovals, squares, and shields.
Automated Galvo-Laser Edge Cutting
For complex custom outlines, sharp angles, or inner cutouts, automated galvo-laser systems follow vector CutContour paths. Heat from the laser beam burns along the path and melts the synthetic fabric fibers instantly, sealing the outer edges to stop fraying over time.
Industry Opinion 1: Using traditional merrowed borders on complex custom outlines is an outdated manufacturing choice; complex shapes should always utilize automated laser-cut sealed edges to maintain sharp design geometry.
Stage 6: Quality Control and Inspection
Quality control teams inspect finished emblems before final packing and shipping.
Checking Color Accuracy and Graphics
Inspectors cross-reference finished prints against physical Pantone color swatches to ensure colors match approved brand proofs. They also review fine text, graphic contrast, and background details under bright lighting.
Verifying Edge Seals and Backing Bond
Quality control technicians inspect edge seals to ensure no loose threads or unsealed fibers remain. They also check backing layers for even adhesive coverage and strong lamination.
Industry Opinion 2: Digital galvo-laser cutting systems are far superior to mechanical steel rule dies for short-run production because laser optics eliminate blade wear and reduce physical setup costs.
Business Advantages of Modern Custom Patches Printing
Investing in modern Custom Patches Printing offers several practical advantages for business branding:
- High Detail Reproductions: Captures intricate graphic details, photographic gradients, and fine micro-text that traditional embroidery threads cannot replicate.
- Lightweight and Flexible Build: Smooth fabric layers lay flat against lightweight garments, caps, and product packaging without adding heavy bulk.
- Long-Term Durability: Dye-sublimation ink bonds directly inside polyester fibers, providing high resistance to fading, washing cycles, and cracking.
- Cost-Effective Bulk Production: High-speed paper printing and automated laser cutting lower setup fees and per-unit costs during large production runs.
Following proper pre press setup, selecting compatible base materials, and using automated laser cutting ensures your Custom Patches Printing projects deliver clean visual results. To explore material specifications, download prepress guides, or request physical sample packs, visit IBEX Packaging.
Frequently Asked Questions
Why is CMYK color mode required for Custom Patches Printing?
Digital screens create colors using RGB light, whereas commercial printing presses use CMYK inks. Converting files to CMYK mode ensures screen designs match physical dye output and prevents unexpected color shifts.
What is the role of a CutContour path in artwork setup?
A CutContour path is a dedicated spot-color vector line in your artwork file that guides automated laser optics or die blades along the exact trim boundary of your design.
How does dye-sublimation print differ from standard screen printing?
Dye-sublimation uses heat to convert dye ink into gas, bonding color directly inside synthetic fabric fibers. Screen printing applies liquid ink onto the fabric surface, creating a heavier, raised texture.
Can printed emblems attach directly to product boxes or rigid mailers?
Yes. Choosing pressure-sensitive peel-and-stick backing allows you to peel off the protective release liner paper and stick the emblem directly onto cardboard mailers, rigid gift boxes, or promotional displays.
Why are vector files preferred over JPEG images for prepress setup?
Vector files use mathematical paths that scale cleanly without pixelation. This allows prepress technicians to set sharp laser trim paths, clear graphic details, and exact Pantone color assignments.
Bring Your Emblem Designs to Life with Expert Printing
Ready to produce high-detail, durable emblems for your corporate uniforms, retail apparel, or promotional packaging? The technical production team at IBEX Packaging offers complete pre press artwork checks, precise color matching, and high-precision laser edge finishing tailored to your exact specifications. Contact our print specialists today to request a custom quote and material sample kit!




It's free and takes 2 minutes. There are 1500+ digital agencies in the catalog that are ready to help in the implementation of your tasks. Choose and save up to 30% on time and budget!